This page intends to introduce our members to tutorials that I feel have influenced us through the years. I will include some of my tutorials, but also other artists.I hope that you may find the information interesting and of value in your practice
Will Rochfort is an artist, Josslyn and I have been watching and learning from for some time. Josslyn came upon this documentary in which Will talks about his career as an artist, his process, and how he commercialised his art.
About the artist
Will Rochfort is a British painter working predominantly in oils using an alla prima technique with a limited palette. His narrative-style work is highly staged using friends and family as models, as well as a collection of elaborate props that he often constructs himself.
The Studio

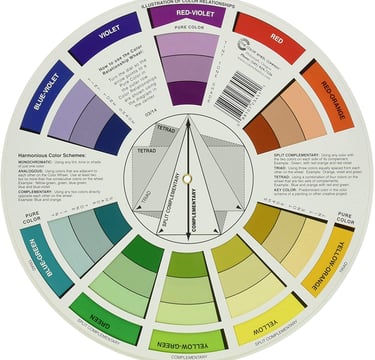
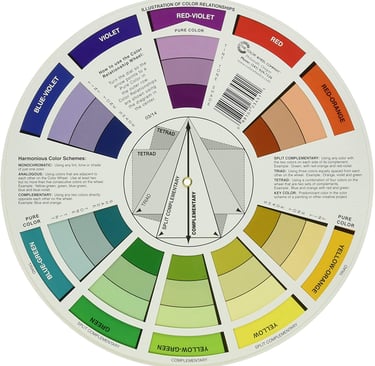
Complementary colours are pairs of colours which, when combined or mixed, cancel each other out (they lose chroma). This is a convenient way to pull back the colour and add grey to your colour mix. However, when placed next to each other, they create the strongest contrast. Complementary colours may also be called "opposite colours". On the colour wheel, they are shown on opposite sides
Tridac colours: Creating colour harmonies. A triadic colour scheme combines three colours evenly spaced around the colour wheel—this link gives you a great tool to choose colour systems that you can use to harmonise your colours.
brand personality (e.g., green to convey growth and abundance). Then they select complementary colours to balance out the main colour and achieve colour harmony
In the colour wheel, they are indicated by a riangle where the coners indicate the colours to us
The Digital Image
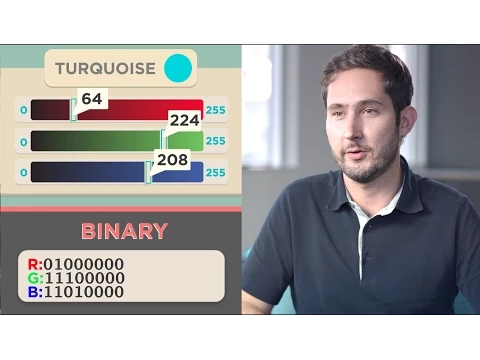
A digital image is a visual representation of a scene, object, or design that is stored and displayed using computer technology. Unlike traditional photographs, which capture images on film, digital images are made up of tiny picture elements known as pixels. Each pixel carries information about colour and brightness, and when arranged in a grid, these pixels form the complete image we see on screens or in print.
Colours are usually stored using combinations of the three primary light colours: red, green, and blue (RGB). By varying the intensity of these components, millions of colour shades can be represented. The amount of detail an image can display depends on two key factors: resolution (the number of pixels in width and height) and bit depth (how many values are available to represent each pixel’s colour). 8 bit, 16 bit, 32 bit, 64 bit. (16 bit is common)


Editing your Digital Photographs
The greater your resolution, the larger the file size. With broadband, file size is less important. However, there are still restrictions on file size when uploading photos and videos. This is due to the amount of memory they use up. It is often best to optimise your images. (file size to quality) before you upload them.
Screen Resolution is 72 dots per inch (low Resolution, lower file size, but lower quality)
Print Resolution is 300 dots per inch (high Resolution, larger file size)
This is best done on an application using a computer. Google Photos or Photos in Windows 11 gives you these editing options. If you use a phone to upload, this is also often offered within the app you are using.
Finding out information about your image. In Windows 11, if your image is on your desktop, try hovering over it. Or right-clicking and selecting properties. This will give you more information about any file.
In Windows 11, you can edit your photos using the Photos Legacy Application.
To save your image, save it as a JPEG, PNG, GIF or TIFF. These nominate the codex you will use to compress your file. Without doing this, your file could be up to 10 times larger. Each type of codec has its own advantages and disadvantages. (JPEG is normal).
What Is a Codec and What Does It Do?
A codec, short for coder-decoder, is an algorithm or tool (software or hardware) that compresses (encodes) digital media data—like audio, video, and images—for storage or transmission, and then decompresses (decodes) it for playback or editing. This process helps reduce file sizes, making data much easier to store or transmit without severely impacting quality UMA TechnologyStreamCloudinary.
Codecs come in two main types:
Lossy codecs, which discard some data to achieve high compression, are useful where minor quality loss is acceptable.
Lossless codecs, which preserve all data, maintaining full fidelity—ideal when quality must remain intact
GIF (Graphics Interchange Format)
Uses an 8-bit palette, limited to just 256 colours—best for simple graphics, icons, and animations WikipediaThe Windows Club.
Employs lossless (LZW) compression, retaining image details across saves Wikipedia.
Supports binary transparency—pixels are either fully transparent or not, no soft edges Lifewire.
Excellent for animations and small graphics, not suitable for photographs with rich colour.
JPEG (Joint Photographic Experts Group)
Lossy compression that discards some image data for smaller file sizes, at the cost of subtle quality degradation over time LifewireWikipedia.
Optimised for photographs with continuous colour variations; not ideal for text or sharp edges, where blurring can occur Lifewire+1.
Doesn't support transparency.
PNG (Portable Network Graphics)
Lossless compression ensures high fidelity and no generation loss, even with multiple edits WikipediaLifewire.
Supports full alpha channel transparency, including soft edges and varying opacity AcquiaLifewire.
Handles both paletted (8-bit) and truecolor formats—up to 24- or 48-bit colour depth Wikipedia+1.
Great for web graphics, logos, and anything requiring crisp visuals and transparency.
TIFF (Tagged Image File Format)
About Digital Imaging Advanced
About Digital Imaging Basic

If you know the language, you can figure out what to do.
Word Glossary
Bounce Light: To point your light source up to the ceiling or wall to give a softer glow with no direct light on the artwork.
Soft Light: Soft or diffuse light: source, eg bounce light, shadow light or overcast day if outside.
Temperature: Lighting has different temperatures: warm (yellow) and cool (blue). Outdoor light has a blue cast. Indoor light usually has a yellow cast. This will affect the colours within your artwork.
Crop You can edit your photographs by using the Cropping Tool in photo editing software, like Photopea, on your computer or iPhone. You can usually rotate, flip, mirror and adjust the angle within this process.
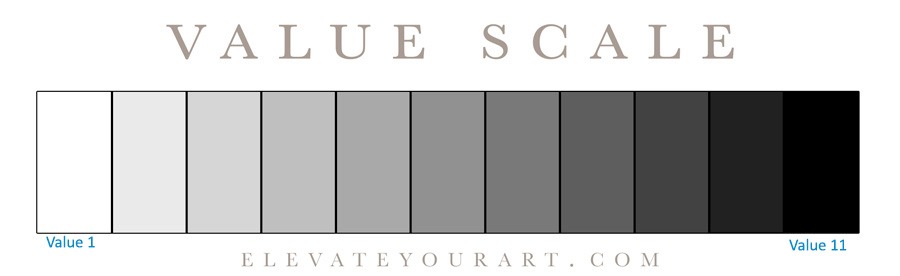
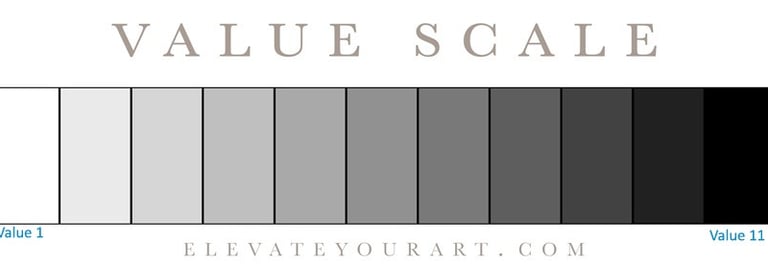
Contrast: is boosting the difference between the dark and light areas and brightening the colour from dull to vivid. *Be careful not to delete your lightest areas.
Brighten: Editing software can brighten your image. Do not overdo this step, as your light areas may disappear and your colours may become too vivid and unnatural. *See Saturation.
Burn: This allows you to darken set areas in your image. Dodge: does the opposite in that it lightens the image.
Lighten the photo.: Avoid overburning by deleting all the image and information within the lightest areas of your painting, eg, Clouds or very light colours.
Highlight: Lightest parts of your image or artwork.
Saturation: how vivid the colours appear in your photos. Over-saturation makes the photo look unnaturally intense and creates artificial, intense and unrealistic colours.
Steps in taking a photograph of your artwork
Turn off automatic flash on your phone or camera.
Take out the glass from framed 2D artworks.
Use a tripod or rest your hands/body on a table or wall to stop camera wobble and blurry photos.
Have as much light as possible, eg open curtains, use outside light, take artwork outside.
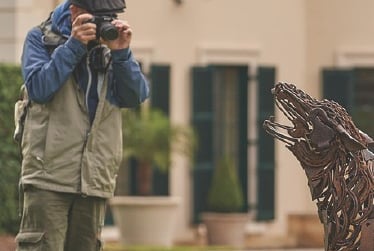
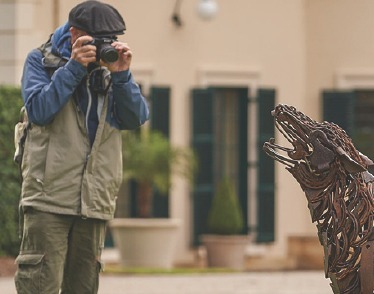
Be aware of your artwork's surroundings and background. Remover any unnecessary distractions and clutter from around your piece.
Enhance your image by editing your photo to make changes to angle, rotation, crop, and brightness. Ultimately, to make your image look as good as it can. The aim, however, is to recreate your artwork as close to your original piece as possible.
Save and rename your image to an App or folder where you can easily find it again.

Photographing your artwork Click to download the document